OnTime Extensions are custom add-ins for OnTime Management Suite and OnTime Dispatch that allow developers to achieve a deep level of embedded integration between an OnTime account and another software system. OnTime Extensions can be created using free tools and a variety of programming languages, including Visual Basic and C#.
OnTime Extensions can be designed to appear in different places across OnTime Management Suite and OnTime Dispatch. These include independent in the ribbon or contextually under invoices, payments, or tracking. The place in which the extension shows itself is determined by the view from which a class inherits.
Technical Requirements
The following tools are required to create an OnTime Extension:
- Microsoft Visual Studio 2010 or greater
- Microsoft .NET Framework 4.0 or greater
- Access to the System.AddIn .NET framework assembly
- Access to the OnTime.Extensions.SDK assembly (located under the folder to which the OnTime Extension SDK was extracted followed by: Bin\OnTime.Extensions.SDK.dll, or available on NuGet)
- Access to the OnTime Extension Packager utility or OnTime Extension Packager for Visual Studio
Independent Extension
Independent extensions will appear as one or more buttons under the Tools tab of the ribbon at the top of OnTime Management Suite or OnTime Dispatch. Independent extensions have full access to data across OnTime and are a good interface choice for general operations, such as importing or exporting data.
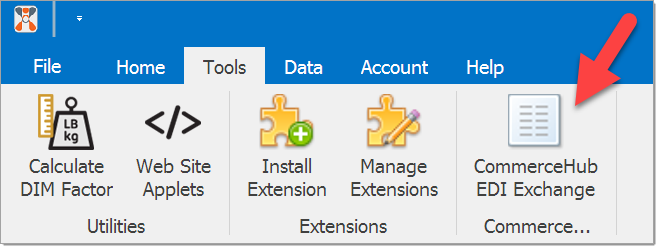
Example of an independent extension appearing in the ribbon under the Tools tab.
Follow these steps to create an independent extension:
- Open Microsoft Visual Studio
- Create a new project of type Class Library (C# or Visual Basic)
- Ensure that the project is set to target the .NET Framework 4.0 or higher
- Add references to the .NET framework assembly System.AddIn and the assembly OnTime.Extensions.SDK to the project
- Create a class or use the class that is supplied when the project is created
- Decorate the class with System.AddIn.AddInAttribute and provide the appropriate information for the name, description, publisher, and version of the extension. You may wish to add import or using statements to System.AddIn and OnTime.Extensions.SDK at this point
- Set your class to inherit OnTime.Extensions.SDK.IndependentView
- Add a method called Initialize() that overrides the Initialize() method inherited from OnTime.Extensions.SDK.IndependentView to your class
- Within the Initialize() method, call the method InitializeExtension() providing the appropriate values for the ribbon page group caption and description
- Create a new instance of the class OnTime.Extensions.SDK.RibbonButton and include the appropriate values for the button caption, description, large image (32x32 pixels), small image (16x16 pixels), and the delegate for the button
- Add the previously instantiated button to the Buttons property of the OnTime.Extensions.SDK.IndependentView class
The empty extension class will look similar to the following:
Extension for Order Tracking View
Contextual extensions can appear as one or more buttons under a tab of the ribbon at the top of OnTime Management Suite or OnTime Dispatch. They can also appear under a context menu associated with a specific list of data, such as orders in the tracking view. Contextual extensions have full access to data across OnTime and are a good interface choice for operations that involve selecting specific records from a list before acting upon them, such as exporting order details to a file or another software system.
![]()
Example of a contextual extension appearing in the context menu of the tracking view.
Follow these steps to create a contextual extension for the tracking view:
- Open Microsoft Visual Studio
- Create a new project of type Class Library (C# or Visual Basic)
- Ensure that the project is set to target the .NET Framework 4.0 or higher
- Add references to the .NET framework assembly System.AddIn and the assembly OnTime.Extensions.SDK to the project
- Create a class or use the class that is supplied when the project is created
- Decorate the class with System.AddIn.AddInAttribute and provide the appropriate information for the name, description, publisher, and version of the extension. You may wish to add import or using statements to System.AddIn and OnTime.Extensions.SDK at this point
- Set your class to inherit OnTime.Extensions.SDK.TrackingView
- Add a method called Initialize() that overrides the Initialize() method inherited from OnTime.Extensions.SDK.TrackingView to your class
- Within the Initialize() method call the method InitializeTrackingExtension() providing the appropriate values for the ribbon page group caption and description
- If you wish to create a button in the ribbon, then create a new instance of the class OnTime.Extensions.SDK.RibbonButton and include the appropriate values for the button caption, description, large image (32x32 pixels), small image (16x16 pixels), and the delegate for the button
- Add the previously instantiated button to the Buttons property of the OnTime.Extensions.SDK.TrackingView class
- If you wish to create a context menu button, then create a new instance of the class OnTime.Extensions.SDK.ContextMenuButton and include the appropriate values for the button caption, image (16x16 pixels), a Boolean value indicating if the context menu button should be displayed, and the delegate for the button
- Assign the previously instantiated button to the ContextMenuButton property of the OnTime.Extensions.SDK.TrackingView class
The empty extension class will look similar to the following:
Extension for Invoices and Payments
Contextual extensions can appear as one or more buttons under a tab of the ribbon at the top of OnTime Management Suite or OnTime Dispatch. They can also appear under a context menu associated with a specific list of data, such as invoices or payments in the billing view. Contextual extensions have full access to data across OnTime and are a good interface choice for operations that involve selecting specific records from a list before acting upon them, such as exporting invoices and received payments to an accounting software package.

Example of a contextual extension appearing in the context menu of the invoices list.
Follow these steps to create a contextual extension for the billing view:
- Open Microsoft Visual Studio
- Create a new project of type Class Library (C# or Visual Basic)
- Ensure that the project is set to target the .NET Framework 4.0 or higher
- Add references to the .NET framework assembly System.AddIn and the assembly OnTime.Extensions.SDK to the project
- Create a class or use the class that is supplied when the project is created
- Decorate the class with System.AddIn.AddInAttribute and provide the appropriate information for the name, description, publisher, and version of the extension. You may wish to add import or using statements to System.AddIn and OnTime.Extensions.SDK at this point
- Set your class to inherit OnTime.Extensions.SDK.BillingView
- Add a method called Initialize() that overrides the Initialize() method inherited from OnTime.Extensions.SDK.BillingView to your class
- If you wish to create an extension for invoice view of OnTime Management Suite, then:
- Within the Initialize() method call the method InitializeInvoiceExtension() providing the appropriate values for the export column name, a Boolean value indicating if the export column should be displayed, ribbon page group caption, and ribbon page group description
- If you wish to create a button in the ribbon for the invoice view of OnTime Management Suite, then create a new instance of the class OnTime.Extensions.SDK.RibbonButton and include the appropriate values for the button caption, description, large image (32x32 pixels), small image (16x16 pixels), and the delegate for the button
- Add the previously instantiated button to the InvoiceButtons property of the OnTime.Extensions.SDK.BillingView class
- If you wish to create a context menu button for the invoice view of OnTime Management Suite, then create a new instance of the class OnTime.Extensions.SDK.ContextMenuButton and include the appropriate values for the button caption, image (16x16 pixels), a Boolean value indicating if the context menu button should be displayed, and the delegate for the button
- Assigned the previously instantiated button to the InvoiceContextMenuButton property of the OnTime.Extensions.SDK.BillingView class
- If you wish to create an extension for payment view of OnTime Management Suite, then:
- Within the Initialize() method call the method InitializePaymentExtension() providing the appropriate values for the export column name, a Boolean value indicating if the export column should be displayed, ribbon page group caption, and ribbon page group description
- If you wish to create a button in the ribbon bar for the payment view of OnTime Management Suite, then create a new instance of the class OnTime.Extensions.SDK.RibbonButton and include the appropriate values for the button caption, description, large image (32x32 pixels), small image (16x16 pixels), and the delegate for the button
- Add the previously instantiated button to the PaymentButtons property of the OnTime.Extensions.SDK.BillingView class
- If you wish to create a context menu button for the payment view of OnTime Management Suite, then create a new instance of the class OnTime.Extensions.SDK.ContextMenuButton and include the appropriate values for the button caption, image (16x16 pixels), a Boolean value indicating if the context menu button should be displayed, and the delegate for the button
- Assigned the previously instantiated button to the PaymentContextMenuButton property of the OnTime.Extensions.SDK.BillingView class
The empty extension class will look similar to the following: